
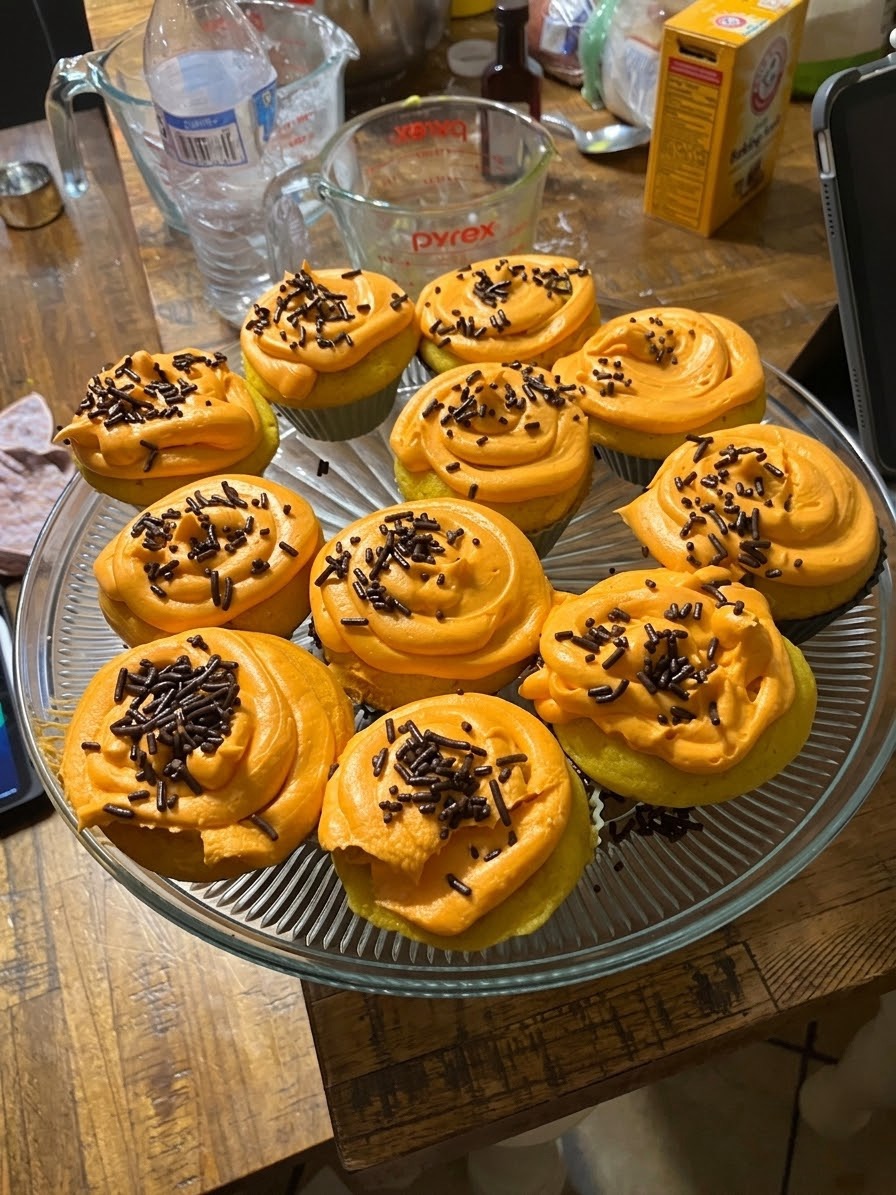
Did we make super scary cupcakes? Well after another chat with Claude Opus, my sister and I baked cupcakes and made our own frosting from scratch. I can say these cupcakes were the most visually appealing and tasty baked goods we’ve made so far. But this isn’t a cooking blog where I try to shove as many words as possible and optimize for SEO; This is just a personal blog where I share cool stuff. Anyways, here is the recipe for both the cupcakes and the frosting.
For the purpose of accuracy and transparency, the recipe is copied as closely to the output from Claude Opus as possible it has been adapted to be compatible and correctly formatted on the WordPress platform. Some content may be edited to fix spelling, grammar, and clarity issues.
Cupcakes
Ingredients
- 1 cup plus 6 tablespoons all-purpose flour
- 2 tablespoons corn starch
- 1 1/2 teaspoons baking powder
- 1/2 teaspoon salt
- 1/2 cup (1 stick) butter, softened
- 1 cup granulated sugar
- 2 large eggs, room temperature
- 2 teaspoons vanilla extract
- 1/2 cup milk
- Yellow dye, about 6 to 8 drops
Before We Begin
There are a few things to be aware of before you begin baking.
- About the baking soda: skip it. Baking soda needs an acid to react with, and there’s no buttermilk, vinegar, or lemon juice on your list. Adding it would give you a faintly soapy, metallic taste and no extra lift. Baking powder already has its own acid built in, so it does the whole job.
- About the corn starch: this swaps a bit of the flour to mimic cake flour. It lowers the protein and gives you a noticeably more tender crumb. It’s worth the extra measuring spoon.
- Cane vs granulated: if your cane sugar is fine-textured, they’re interchangeable. If it’s the coarser, sandy kind, use the granulated sugar for the cake batter since big crystals don’t cream properly into butter.
- Baking Time: The thermodynamics of ovens may vary around the world. We needed to bake for an additional five minutes with our oven. Practice food safety and ensure your cupcakes are fully cooked before enjoying. This step may be skipped if you are baking for display purposes and not intended for consumption.
Instructions
- Heat the oven to 350°F. Line a 12-cup muffin pan with paper liners. Run your fingers across the pan first to confirm all 12 cavities are lined, since a stray unlined cup is a rough discovery later.
- In a medium bowl, whisk together the flour, corn starch, baking powder, and salt. Whisk about 20 seconds, longer than feels necessary, so the leavening is evenly distributed.
- Put the yellow dye directly into the 1/2 cup of milk and stir. This is the trick worth keeping: coloring the liquid first means the color distributes evenly on its own, so you never have to check for streaks in the batter.
- Beat the softened butter and sugar together on medium for 3 to 4 minutes. You’re listening for the sound to change from a heavy scraping to a lighter, airier whipping sound. The mixture should feel fluffy and slightly gritty if you rub a bit between your fingers, not dense and greasy.
- Add the eggs one at a time, beating about 30 seconds after each. Add the vanilla with the second egg.
- Add the flour mixture in three additions, alternating with the yellow milk in two additions. So: flour, milk, flour, milk, flour. Mix on low just until each addition disappears. Stop as soon as the batter feels smooth. Overmixing here makes tough cupcakes.
- Scoop the batter into the liners, filling each about two thirds full. A standard ice cream scoop or a 1/4 cup measure gets you there in one clean drop per cup, which is much easier than eyeballing with a spoon.
- Bake 18 to 20 minutes. Set a timer for 18. Doneness cues that don’t need eyes: press the top lightly and it should spring back rather than hold a dent, and a toothpick inserted in the center should come out with dry crumbs, not sticky batter clinging to it. The kitchen also stops smelling like raw eggy batter and starts smelling toasty and sweet, which is a reliable signal.
- Cool in the pan 5 minutes, then move to a rack. They must be completely cool before frosting, about 45 minutes. Check the bottom of one with your palm. If it’s still warm, the buttercream will slide right off.
Vanilla Buttercream
Ingredients
- 1 cup (2 sticks) butter, softened
- 4 cups powdered sugar
- 2 teaspoons vanilla extract
- 1/4 teaspoon salt
- 3 to 4 tablespoons heavy whipping cream
- Yellow dye, optional, if you want the frosting to match
Instructions
- Beat the butter alone on medium-high for a full 5 minutes. This is the step people rush, and it’s the one that matters most. Properly whipped butter feels light and almost cool, and it makes the difference between silky frosting and a sugary paste.
- Turn the mixer to its lowest speed and add the powdered sugar in two additions. Low speed is not optional unless you enjoy a powdered sugar cloud in your face, which is genuinely unpleasant to breathe.
- Add the vanilla and salt.
- Add the cream one tablespoon at a time, beating well between each. Judge consistency by feel: lift the beater or a spatula, and the frosting should hold a soft peak that slowly bends over. “Too stiff to spread” means “add another half tablespoon of cream.” “Too loose to hold shape” means adding a few more tablespoons of powdered sugar.
- Beat on medium-high for 2 more minutes at the end. It gets noticeably lighter.
Frosting and Sprinkles
Before We Begin
- For the cake and frosting, you’ll need 3 sticks of butter total, so pull them all out to soften at once. “Softened” means it dents easily under your thumb but still holds its shape.
- If you want to split the work with a cooking partner, one person can do the dry whisk and the sprinkle dipping while the other runs the mixer, and whoever is more comfortable with the oven handles the pan transfers. Pulling the rack out a few inches with a wooden spoon handle before reaching in makes that part a lot less fraught.
- If you have leftover heavy cream and want a lighter alternative to buttercream, you can whip 1 cup of cold cream with 1/4 cup powdered sugar, 1 teaspoon corn starch, and 1/2 teaspoon vanilla until it holds firm peaks. The corn starch stabilizes it so it doesn’t weep. It needs to stay refrigerated, though, so buttercream is the better choice if these are sitting out for a while.
Next Up
The easiest non-visual method is spreading, not piping. Hold the cupcake in your non-dominant hand with your thumb and fingers around the rim so you can feel the edges. Drop a generous spoonful of frosting in the center and spread outward with the back of the spoon until you feel it reach your fingertips all the way around.
For the sprinkles, pour the chocolate sprinkles into a shallow bowl and dip the frosted top straight down into them, then rotate a quarter turn and dip again. Cleaner coverage than sprinkling from above, and no scattered sprinkles across the counter.
Future Plans
I have a few future ideas of things we’ll be baking. We want to create some sugar cookies with unique shapes; we plan to do so by 3D printing cookie cutters customized with services available at our local library. We are also planning on creating donuts, but further research is needed, and we may require molds. I’ll keep you, my readers, updated on my future cooking projects!
You must be logged in to post a comment.